CryptoGeisha x KAI

About the collaboration
I’ve been involved with the CryptoGeisha team since I first noticed the project and reached out to the duo to see if I could offer some advice. I’ve also wanted to collaborate with them as an artist, so when my friend Martin beat me to it with a Savage Dogs collaboration, I cleared out my schedule to finally do a collaboration drop!
Bitwise — The Process, d.Hexabit — The Patterns
Having seen some of my work for my generative art and my previous collaborations, the team asked me to share my process, so I documented the process, which I’ve dubbed Bitwise which includes the use of my 4,096 patterns I’m calling d.Hexabit. I’ll have to write more about these in another post.
From start to finish
What follows is a step-by-step walkthrough of how I created the final piece. I kept this blog post open and just dropped in images from the work as I finished each step. I hope you enjoy seeing behind-the-scenes!

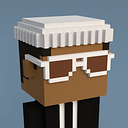
This was the original image that the CryptoGeisha team made for me. I asked for it to be relatively flat so that I could separate and mask the colors easily as I go along.

Every time I work on a new piece, I evolve a set of code libraries that I first originated in 2014. These describe a set of 2x2 pixel, 3-bit patterns (d.Hexabit) — of which there are 4,096 combinations.
I’ll go into more technical detail in a later post, but I have a process for mapping flat colors to their closest pattern. Above is a pass using one configuration.

Here’s another pass, using a different set of pattern choices.

I went back to the source image and did some color adjustments and then applied the patterns again.

Again, I tried different configurations of patterns until I arrived at this one.
So now, I want elements from each of these, and clean, crisp black lines to put over the top of them, so I take an image and reduce it to the final resolution (256x256) and keep it pixellated.
Then I take the threshold value to get black & white lines.

Now I need to start masking out each of the parts onto different layers so i can get the elements that I want: the hair from the 1st pass, the face & tiara from the 3rd pass, the hairpins from the 4th pass.
I also want the golden hoops to be only yellow & white stripes.
Next, in a graphics editor, I did a lot of compositing and clean-up…

After it’s all composited I have a layered image that looks like this as a proof-of-concept before I animate the background.

To animate, I drew all of the mask layers I wanted to use for 15 frames of animation.

Imported as layers, I can animate the mask to test it, but I’ll be applying this mask by hand to the background layers and compositing all 15 frames.
I could probably do this more quickly using video compositing tools, but I do everything frame by frame, using indexed color, so that the final result is crisp and pixel perfect– and I can export them as super optimized GIF animations.

I created 2 layers for the background, and copied the top layer to apply each frame of the mask.

Now I’ve got copies of the top layer with masks applied and need to export 15 frames.

Frame by frame animation can be tedious, but the result is worth it:

Then I had this idea to animate the patterns as well, thinking it might look like the lines had more motion to them, but the end result just hurt my eyes…

Plus, it’s not a perfect loop, so I would have had to do this for 30 frames.
So I thought — maybe I can animate the blue pattern in the eyes, but that didn’t work so I had the idea to do a color cycle…

I cleaned up the eyes a little and did a quick test- but now to plan the color cycle. There are 30 different color combinations possible. The easy thing would have been to cycle through them randomly, but I wanted there to be a progression.
I made some notes to plan it out:

Next, I made all the layers for the outer and inner colors.

At this point trying to export frames by switching layers on and off would have been too tedious and error-prone, so I made copies of all the layers and put them in folders so I could have one frame per folder.

Then going through each layer group, switching it on and exporting a PNG.

Almost done, the last step is to re-import the images as layers, optimize the color palette, resize to 1024x1024, and export as an animated GIF.

Finished, right?
Except something is bothering me now. See these little pixels?

Those will drive me nuts if I don’t fix it. Even though it means editing each frame of the GIF, I needed to do it.

Ok. Now we’re done.
Check out CryptoGeishas #42 which has been released! And follow me @kaigani on Twitter.